The Western Coachman

       The story of Wayne “Buz” Buszek and his Western Coachman begins in the 1930s. Buz began fly fishing the local streams of Californias Sierra Nevada Mountains as a young boy. His abilities as a fly tier and fly fisher developed quickly, thanks to guidance from the local old timers.He excelled, developing into an exacting and innovative fly tier, a skilled fly fisher, and a mountain goat of a hiker.

Read More

Circus Peanut | Al Ritt

Throwback to the first season of the Fly Fusion Series with Al Ritt on the vise. Filmed on location at Island Lake Lodge, nestled in the heart of the Rockies in the Kootenay region of British Columbia.

Error getting video from vimeo API.

Mono-Loop Hopper by Ryan Sparks

Additional pattern, the Mono-Loop Hopper, from Ryan Sparks’ article in the latest issue of Fly Fusion.

Mono-Loop Hopper Recipe

Hook: Dai-Riki 700B, #10

Thread: UTC 140, dark tan

Mono-loops: 10 lb. monofilament

Body: Superfine Dry Fly Dubbing, tan

Overbody: 2mm foam, tan

Wing: 2mm foam, tan

Overwing: Antron yarn, white

Legs: Barred round rubber legs, yellow/black

Indicator: 2mm foam, orange


Mop-Top Beetle by Ryan Sparks

Additional pattern, the Mop-Top Beetle, from Ryan Sparks’ article in the latest issue of Fly Fusion.

Recipe

Hook: Fulling Mill 35025, #8

Thread/Body: Veevus 140, black

Hackle: Grizzly Hackle

Shell: 2mm foam, black

Legs: Medium round rubber legs, black

Indicator: 2mm foam, orange

Post: McFlylon, orange

Key Ingredients To Killer Dries

Size, shape and colour frequently factor into fly-pattern selection. However, there are additional elements that should be considered. Bob Reece’s department in the summer issue of Fly Fusion discusses the wisdom of having translucency and vulnerability represented in your fly box. Among the flies recommended in the article is the Colby Crossland’s Klink Hopper. Pick up a copy of the summer issue of Fly Fusion Magazine on newsstands, in fly shops and available through subscription. Thanks to Bob Reece for article and tying vid!

Error getting video from vimeo API.

Deadly Emergers: CW’s CDC & Foam PMD Emerger 

by Chris Williams 

As one who has for years enjoyed fishing the tailwaters and spring creeks of the West, I have become enamoured with the trout’s propensity for keying in on emerging and crippled mayflies. When in this emergent stage, the mayfly is most vulnerable to predatory trout, and the fish soon figure that out.  

With this in mind, I have designed most of my dry and emerger patterns from materials that move, are soft, and replicate the profile of a natural insect. Initially I used mostly natural materials such as furs and feathers, but with such a rich abundance of new fly tying materials on the market, some synthetic materials have found their way into my flies. 

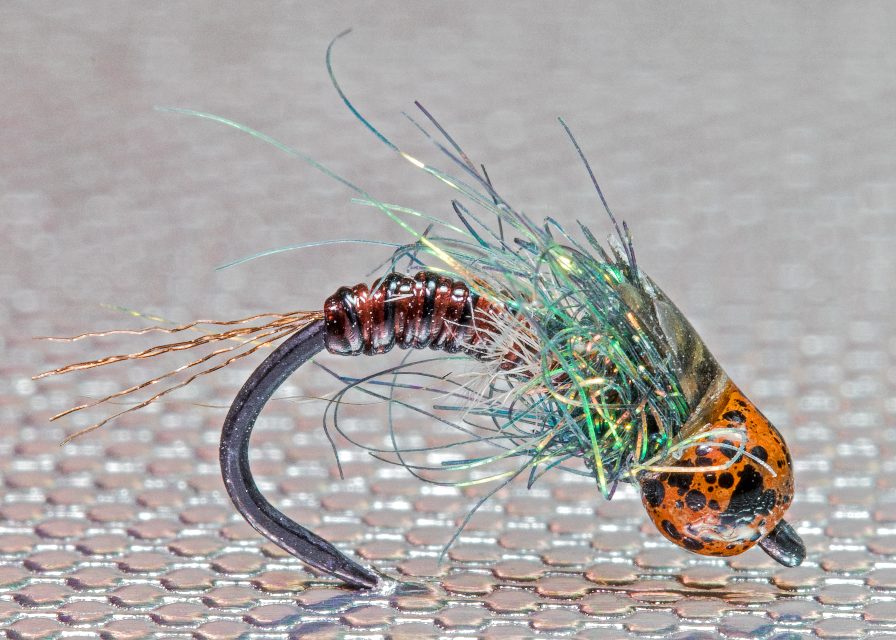
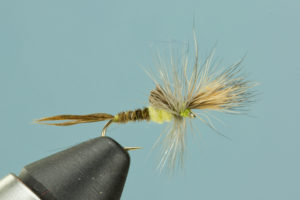
This pattern is a marriage of natural and synthetic materials to fit a very specific purpose, and it was several years in the making. I wanted to produce a fly that sat trapped in the surface film, but also retained excellent buoyancy, had a very lifelike appearance, and was easily visible. I’ve long been a huge fan of the beautiful spring-creek patterns designed by Idaho’s Rene Harrop. His flies epitomize realism and natural movement. Like Harrop, I have found CDC wings to provide these qualities. However, they always required a great deal of maintenance to keep them afloat. I incorporated a foam wing case to provide a platform for the CDC to sit on to retain better buoyancy. That platform also helps the wing stand upright for better visibility.  

But I also wanted the wing case to look as if it were splitting to allow the wing to emerge. This was the most pressing problem in tying the fly. How do I get the wings through a hole in the foam? After a variety of disappointing attempts at both pushing and pulling the wings through the foam, I finally settled on using a small wire threader that’s designed to fit through the eye of the hook. The wire is thin enough to easily push through the hole in the foam without tearing it. 

I also decided on a trailing shuck of antron dubbing with a bit of deconstructed Semperfli Glint Nymph for added sheen and softness, and for its realistic, translucent appearance when wet. By “deconstructed,” I mean a strand of Glint Nymph that I’ve scraped between my thumbnail and forefinger until the fibres separate. I then overlay it onto the Antron dubbing that has already been tied in. I’ve never been a huge fan of antron and Zelon shucks that are often preferred by tiers because of their stiffness. The dubbing is much more flexible. 

The body material is a turkey biot which mimics the thin, segmented profile of the natural. The thorax is made of natural dubbing. Just enough hackle wraps are added to provide a good platform for the fly to land on, and to help keep it afloat. 

I fish this fly like any emerger or cripple pattern. Usually it is cast to difficult, discerning fish on slow-moving water with multiple currents. My favourite approach is to target a specific fish and present a quartering downstream dead-drift with either an upstream or downstream mend, depending on the different currents. Occasionally, I move the fly ever so slightly if a trout is particularly selective, to give the impression of the mayfly escaping the nymphal case. When done properly, this has fooled some spectacular trout over the years. 

While no fly pattern is perfect for every situation, this fly checks off all the boxes when fish are keying on emergers. The variety of materials with which it’s tied allows it to imitate the translucence, delicate profile, and movement of natural specimens while still providing buoyancy and visibility.  

Materials: 

  • Hook: Moonlit Fly Fishing ML 051 Emerger Hook or similar curved emerger hook 
  • Thread: 17/0 Uni Trico Thread 
  • Shuck: March Brown antron dubbing overlayed with deconstructed Semperfli Rust Glint Nymph Tinsel 
  • Abdomen: PMD turkey biot tied with the notch down for a furled body 
  • Wing Case: 1mm tan translucent Razor Foam 
  • Wings: 2 matched goose CDC feathers 
  • Thorax: PMD-coloured dry fly dubbing. I make a blend of of natural seal’s fur, opossum, rabbit, and fox. 
  • Hackle: Two wraps Whiting Farms honey dun rooster or hen hackle 

Tying Instructions: 

  1. Start the thread about halfway down the hook shank. Tie in a small tube of antron dubbing overlayed with a strand of deconstructed Glint Nymph with a couple of thread wraps. Wrap thread, covering the shuck material with touching turns halfway down the hook bend. 
  1. Tie in a PMD turkey biot with the notch turned upward so as to wrap a furled body. Wrap the biot forward to the point you started your thread, forming the abdomen, and tie off with a couple of thread wraps. Trim the excess. 
  1. Tie in a 1 mm foam strip approximately 1/8” wide. Wrap a couple of wraps forward and fold the foam back over itself. Use two more thread wraps to secure the two pieces of foam angling back over the abdomen.  
  1. Use a bodkin to gently make a hole through both foam pieces directly in the middle of the foam and just above the point where it is tied in. Hold the two pieces of foam and push the threader through both holes. 
  1. Match two CDC feathers so their convex sides are touching and the tips are even. Wet the CDC feathers. (I use a drop of Watershed to do this.) Slide just the wing tips into the threader and gently pull them through the foam. 
  1. Position the wings, use several thread wraps to secure them, and trim the excess. Then move the thread to the hook eye and tie in a honey dun hackle over the front of the eye with shiny side facing you. 
  1. Dub a thorax, leaving the thread in a position slightly behind the hackle. Then wrap two wraps of hackle back toward the thread.  Make a thread wrap through the hackle, trapping the tip and then secure with a couple wraps just behind the eye. 
  1. Cut off the hackle tip. Trim hackle barbs in a “V” on top and underneath the fly. Trim the forward-most foam piece just past the hole.  Pull the remaining foam piece forward using gentle wraps to tie down, forming the wing case. Whip finish and trim foam. 

Check out Chris’ other patterns by clicking here and visiting him on Facebook.

(Editor’s Note: This article originally appeared in the spring 2018 issue of Fly Fusion Magazine under a different tier’s name. Chris Williams is the correct tier.)

Reece’s Glo Worm

by Bob Reece

They may not be valued by all fly fishers, but aquatic worms play an important role in the food webs of many trout waters. Imitations of them can produce exceptional fishing throughout the year. Their abundance in some of the waters that I fish drove me to create my Glo Worm.   

 My objective was to create an annelid that could be effectively fished in indicator and tight-line riggings, but also as a dropper. To work as a dropper it needed to have sufficient weight, since I would not be able to add split shot. Tandem tungsten beads help the pattern descend quickly. By placing them at the midpoint of the shank, the hook is heavily keeled during its drift. This helps reduce snags as it glides over the substrate. 

While the weight was important I also wanted a smooth contour. By using beads that were similar in colour to the body material, only a subtle variation of colour is visible. Applying beads one size smaller than the chosen hook size creates a gentler taper. The front of the beads face each other on the hook shank. This leaves the cavity of each bead available for finishing off the body material. It also forms a crisp cylindrical boundary of the bands as on the body of the natural. The appearance is further enhanced through the use of Tactical UV Resin.  Additionally, UV material and Sexi Floss display a transparency similar to that of real aquatic worms. This combination of factors is bolstered by the tantalizing movement of the Sexi Floss strands.  

Though atypical of rubber worm patterns, the thin profile of the Glo Worm is beneficial. This reduction of surface area, paired with its tungsten weight, rockets this pattern down to the set distance below the surface. It also lets me tie the pattern through a wider range of sizes, from size 8 down to 16. This package has fooled trout across all seasons and moving water fisheries. To watch tying video click here.

Next Gen Nymphs: Reece’s 307

by Bob Reece

Transition stages in the subsurface development of aquatic insects are often times of vulnerability. During these metamorphic moments, the bug’s full range of motion and the responsiveness of its senses are temporarily lost. This means easy food for trout. With these factors in mind I designed my 307, a transitional mayfly pattern that is a productive divergence from the norm.   

The Tiemco 2499BL-Bk hook pins itself in place in trout jaws with its upturned super point, and has the strength to handle large fish. Its matte black finish can be beneficial on heavily pressured waters.   

Flouro Fiber forms the tail of this pattern. Small UTC wire inserted into midge stretch tubing is used to create raised segmentation in the abdomen. The smoothly raised divisions of the wire accent the transparency provided by the stretch tubing. This combination is very durable.  

Ostrich herl and Ice Dub form the bulk of the thorax. Their movement and reflectivity suggest opaque appendages and internal gasses in the transitioning naturals. The enlarged and elevated wing case further accentuates this important trigger.   

The mottled tungsten bead accelerates the 307 to the targeted depth. More importantly the mottled olive and brown colour provides a more natural look than the metallic sheen of traditional beads. This can be especially important in times of extreme water clarity. It is also beneficial on waters that see heavy fishing pressure.  

Anytime mayflies are hatching, a properly presented 307 will produce fish. I often fish it as a dropper below my preferred dry in the early morning and late-day hours. During an active hatch I shorten my dropper tippet so the 307 rides six to eight inches below my dry. This can be deadly when the colouration of the fly matches the emerging mayfly. It’s also important to remember that many emerging mayflies fail to break through the surface film and subsequently perish. These failed emergers sink and drift along the bottom. As a result, the 307 is also an effective pattern for deeper water indicator-rigs. Click here to check out the tying video.

The Life of a Bug in a Day | Al Ritt

Fly anglers don’t always have access to in-depth bug charts when they’re out on the water, and sometimes entomology’s Latin terminology doesn’t stick all that well in the long term memory. One of Fly Fusion’s fly-tying editors, Al Ritt, provides a quick-reference entomology framework with ideas and patterns for anglers who want to go deeper and are looking for a good place to start.

A sneak peek recipe…please “Read More” for more recipes and to to read the full article.

Quigley Cripple

Tail:  Ringneck pheasant tail fibers

Rib:  Fine gold wire

Abdomen:  Ringneck pheasant tail fibers (butts of tail fibers)

Thorax:  PMD Superfine dubbing

Spike:  Deer hair

Hackle:  Dun dry fly hackle

Read More

Stellar Stillwater Performer–The Titan Tube Midge 

by Landon Mayer

The Titan is the giant of the Tube Midge family, meant to represent Chironomids, one of the most important food supplies in any stillwater. The Titan is larger – ranging from #12 to #16, and has two pieces of small coloured wire inserted into clear Micro Tubing and three wraps of two coloured wires at the bend of the hook to secure. This allows it to look like a slim body inside a clear case. Unlike other chironomid imitations the white in this tie is not a bead, but white ostrich wrapped three times around the thorax and secured by white 8/0 Uni-Thread. A single wrap of tinsel behind adds a hint of flash. The ostrich moves like the gills on a natural and attracts cruising giants to the fly.  

Chironomids in still water are on the move. When I set up a rig I always keep that in mind. One of my favourite ways to maximize movement in a fly is by using a non-slip mono loop knot. This allows the fly to move naturally and encourages the fish to react and strike. In addition to movement I believe in removing anything unnatural from my rig to prevent making the fish wary. This is why the tungsten bead works well – it’s a lot of weight in a small package. 

If I’m using a single fly set-up I typically use a 9 foot, 3X fluorocarbon leader connected to the fly with a non-slip loop knot. This is a favourite when using a slow finger-over-finger retrieve. But I often use two- or three-fly rigs. In shallow water I typically use two flies to prevent snags and have a better chance of landing trout that go into the weeds. In deep water I prefer to cover more water depths with three flies to find out where the trout are feeding. When building a two-fly rig, I attach a two-to-three foot piece of 3X or 4X fluorocarbon tippet using a triple surgeons knot, leaving six-to-eight inch tag ends. When the knot is complete I cut off one of the tags and connect the fly to the other tag with a non-slip loop knot. The second fly is then attached to the long end using the same knot. With a three-fly rig I repeat the same process with a second piece of 3X or 4X fluorocarbon and connect the second fly to the short tag end off the surgeons knot, then attach the third fly to the final long tag end. The advantage to the flies on short tag end with an anchor fly below is maximum movement whether the rig is hanging still, bouncing in chop, or being retrieved with strips or twitches. The final ingredient is a large, medium, or small, clear or white Thingamabobber indicator to suspend the flies. If I am casting longer distances I use an orange Thingamabobber to improve visibility.