Bruce’s DDP Stone | Justin Bruce @justinbruceflies
As seen in the Winter 2019 issue of Fly Fusion Magazine
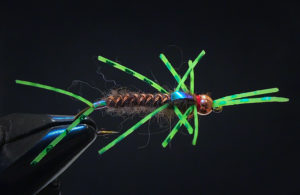
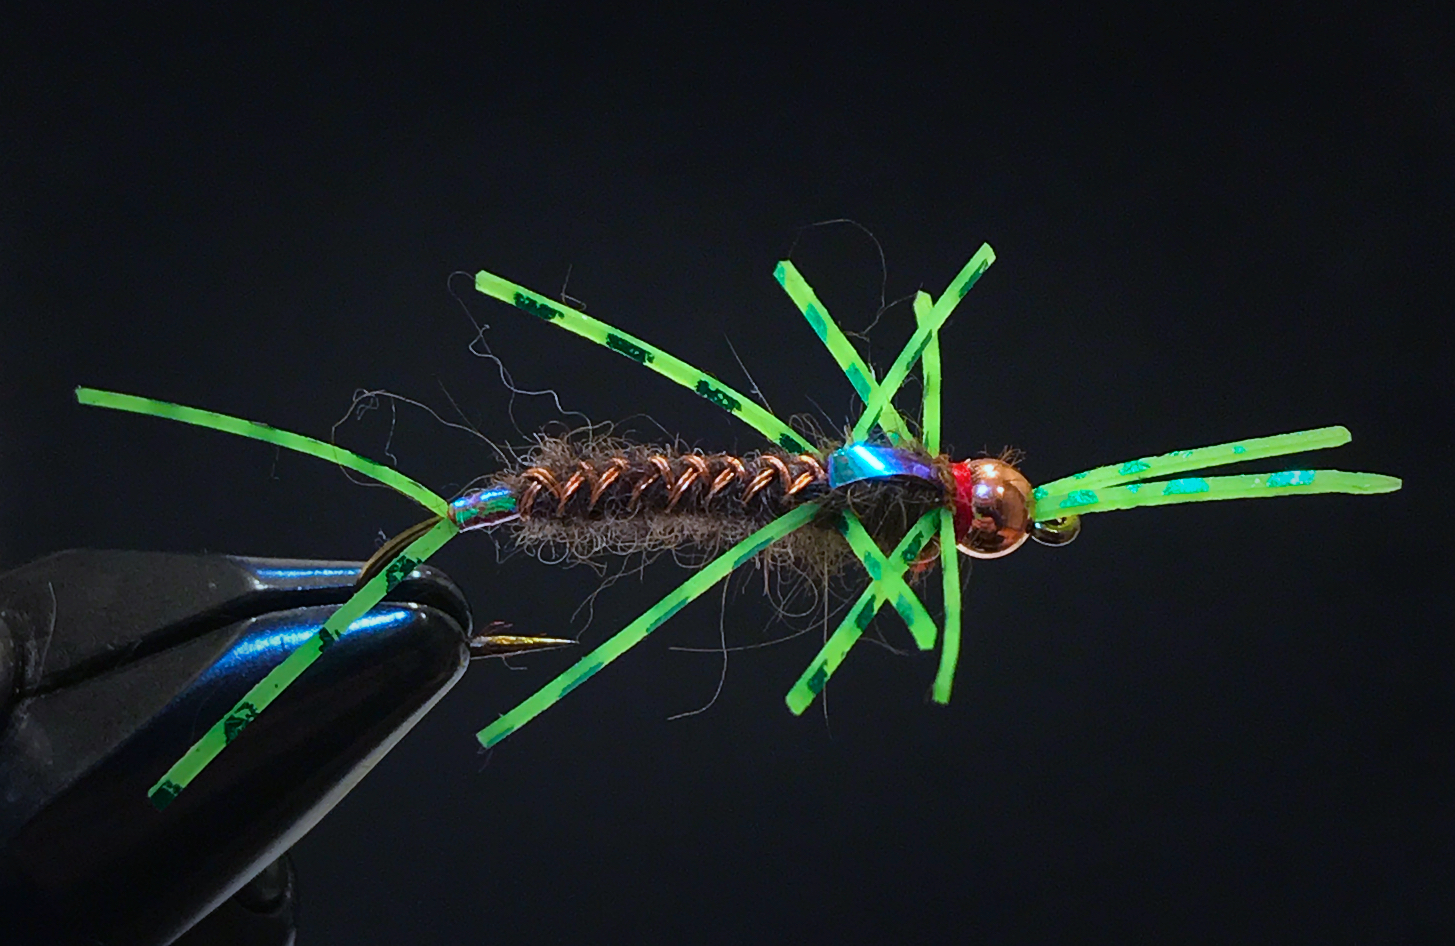
Sitting at the vise, I thought, I want a heavy, buggy, leggy, stonefly that uses my Houdini-weave and lays the smack down like Diamond Dallas Page. Blame it on the Dark Side of the Moon soundtrack playing in the background, but what came off the vise was a DDP stone. Some people swear by natural imitations, but I’ve always been a sucker for wild colours and flash. Green legs have been the ticket on North Georgia’s Toccoa River tailwater lately.
With emerging interest in Euro nymphing, getting down fast seems to be the name of the game. There are a few of us who still love to swing soft hackles, but the DDP stone is designed to meet one’s deep-depth needs. The large bead also allows a tier to slide some .025 or .030 lead wire up front if he’d like.
I’m excited about the “Houdini-weave” that makes up the body of this fly. After creating this weave by accident last year, I have become consumed with trying to find every material possible that I can weave. If the material is thin and flexible, I’ve probably tested it. Let’s just say my daughter’s baby dolls are missing some hairbands. One question I often get is, “why do you cover the shank with tinsel first?” Before I answer that, I’ll say that after using the Houdini-weave for over a year, the ideal scenario is to use two wires on a bare hook shank. The wire slides down and seats itself perfectly. But it can’t be done on a bare shank. There is this matter of the thread… But the wire hangs up and grabs the thread and slides down unevenly. However, covering the shank with overlapping wraps of large tinsel will save your soul. The tinsel underbody allows the wire to slide down almost as easily as on a bare hook shank. Plus, the tinsel allows you to create a small flashy hotspot at the tail.
Semperfli Nymph Dub also makes this fly unique. As the perfect material, the Nymph Dub simply marries the wire to create a buggy, two-toned, segmented body. There are some bells and whistles that you can add, like UV over the wing case, but the DDP has fished just fine as is, and my fly box continues to get heavier with them. I’m not sure if they are more fun to tie or to fish, but both experiences keeps bringing me back to the vise.
Materials
Hook: Firehole 718/Tiemco TMC 200r, #4-8
Bead: 4mm Firehole Copper Stone
Tail/Legs/Antenna: Green Sili Legs
Body: Semperfli dark grey Nymph Dub and Copper UTC Brassie Wire
Thorax: Hareline Krystal Dub, olive brown
Wingcase: Large pearl tinsel over pheasant tail fibres
Thread: Veevus 10/0, red
Tying Instructions
1. Slide the Sili legs through the bead and tie them in behind the eye and whip finish. Remove the thread. Slide the bead up, reattach the thread, and tie the tails in at the bend of the hook.
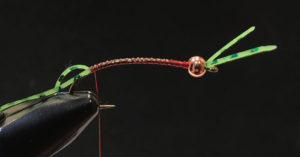
2. Tie in the large tinsel and create a small hotspot with three or four wraps on the shank at a position opposite the hook point. Secure the tinsel with a few wraps to build a small bump. This will keep the weave from sliding down over the hotspot.

3. Continue wrapping the tinsel forward to just behind the bead. Whip finish and remove the thread. This leaves a smooth surface to slide the dubbing and wire down as you weave the body.

4. Prepare 12 to 14 inches of the Nymph Dub and wire (doubled over) by tying the string of dubbing and the wire together at each end with simple overhand knots to create a large loop. Orient the vise so you are looking down the the hook shank and the head is facing away from you. Start the Houdini-weave up against the thread bump.
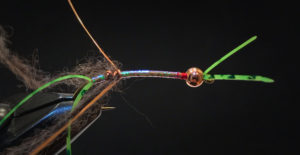
5. Continue the Houdini-weave, taking the Nymph Dub from each side over and around the shank, then the wire from both sides under and around the shank (in that order), proceeding up the hook-shank to just past halfway. Keep tension on the dubbing and the wire by pulling toward the bend of the hook to ensure they slide down and seat evenly.
6. Return the hook to the original position, reattach the thread and tie off the wire and nymph dub. Tie in the large tinsel then the pheasant tail fibres at the spot where you finished the weave.
7. While dubbing the thorax, add a set of legs at the back of the thorax and just behind the bead. Pull pheasant tail fibres and tinsel over the dubbed thorax and secure them behind the bead.
8. Add a very small amount of dubbing to cover the butt ends of the pheasant tail and make some wraps to create a red hotspot on the collar. Whip finish and finish with head cement or UV resin. Trim the legs, tail, and antenna to the desired length.